إستخدام الحزمة Socialite لتسجيل الدخول بإستخدام حساب جوجل في لارافيل
في معظم المواقع والتطبيقات في التي يتم العمل عليها، يطلب العميل أن يتمكن المستخدمين من إنشاء حساب أو تسجيل الدخول من خلال Google, Facebook, Linkedin، في هذه السلسة سيتم شرح كيفية القيام بذلك في إطار العمل لارافيل.
واحده من أفضل الحزم packages التي تمكننا من القيام بذلك هي حزمة socialite
إنشاء حساب أو تسجيل الدخول بإستخدام Google في لارافيل
حتى يتم دمج وإضافة إمكانية تسجيل الدخول بإستخدام حساب جوجل، بالبداية لا بد من الذهاب إلى Google Developer Console وإنشاء تطبيق جوجل، وذلك من أجل الحصول على client_id, secret_id. ومن أجل الحصول عليهما يمكن إتباع الخطوات التالية
الذهاب إلى Google Developer Console وإنشاء مشروع جديد.

ستظهر لنا نافذه حيث يجب إختيار إسم للمشروع، ومن ثم نضغط على create

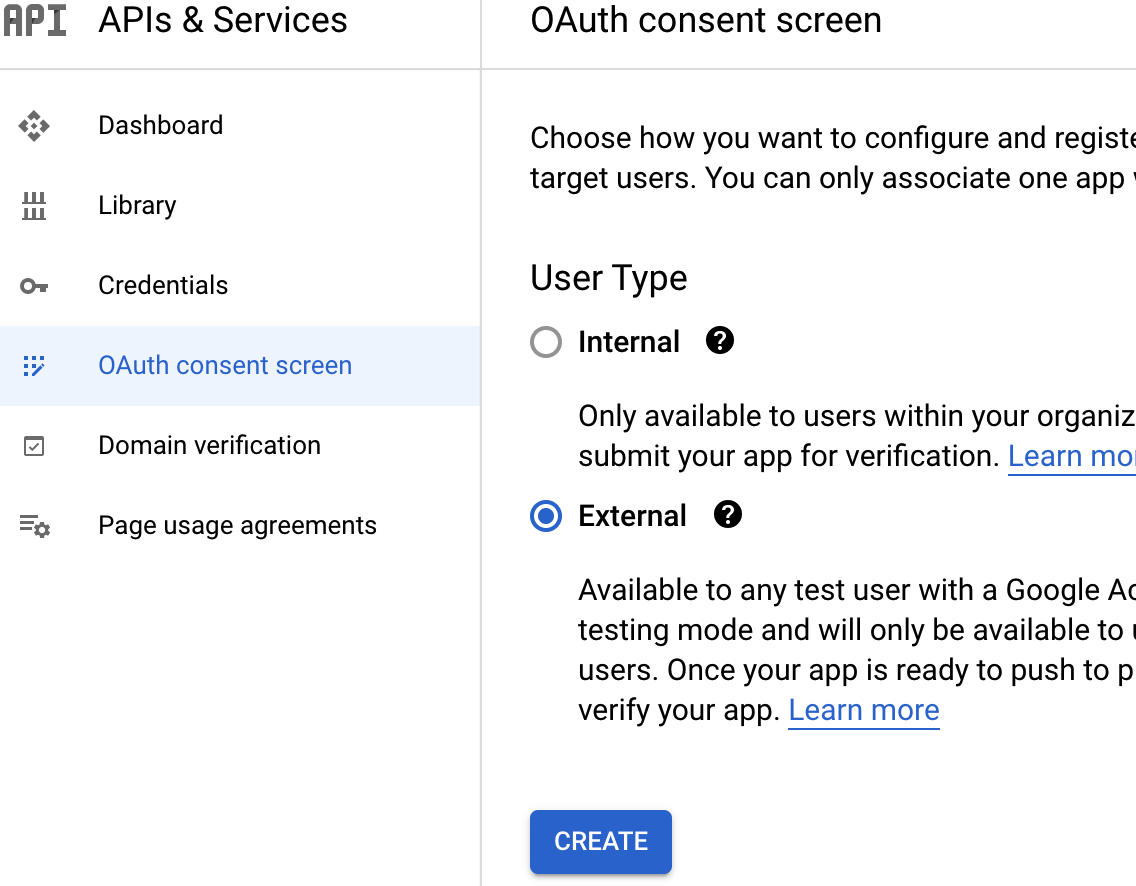
في الشريط الجانبي نختار OAuth consent screen ونضع قيمة User Type = External

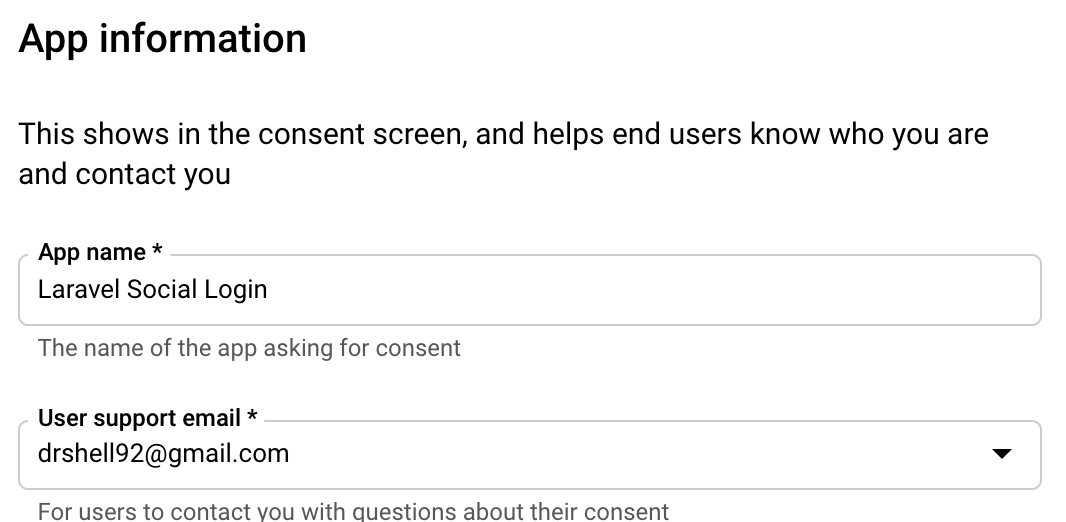
نقوم بتعبئة App Information كما بالصوره ومن ثم نضغط على save and continure

في التبويب الجانبي نختار credentials ومن ثم نضغط على create credentials ونختار 0Auth Client ID

نختار نوع التطبيق على أنه تطبيق ويب application type ومن ثم نضيف رابط الموقع/ التطبيق، وكذلك رابط redirect ومن ثم نضغط على create

يظهر لنا صندوق منبثق به client id و client secret

إعدادات لارافيل
الذهاب إلى ملف srvice.php فهو الملف الذي يتم إضافة Third Party Service به، ونقوم بإضافة Google Service
'google' => [
    'client_id'     => env('GOOGLE_CLIENT_ID'),
    'client_secret' => env('GOOGLE_CLIENT_SECRET'),
    'redirect'      => env('GOOGLE_REDIRECT')
],
تذهب للملف .env وضع قيم GOOGLE_CLIENT_ID, GOOGLE_CLIENT_SECRET, GOOGLE_REDIRECT
GOOGLE_CLIENT_ID=443090683542-u5frlispjiitvoul6ffdafdafdjvbsora090umko.apps.googleusercontent.com
GOOGLE_CLIENT_SECRET=tFcDjY5_90B6kOafdafdafd2dDY7MNA
GOOGLE_REDIRECT=http://127.0.0.1:8000/callback/google
حيث إن قيم Google_client_id, google_client_service هي ما حصلنا عليها من خلال جوجل.
تثبيت حزمة socialite
composer require laravel/socialite
نذهب للمسار config/app.php ونضيف SocialiteServiceProvider بداخل Providers
'providers' => [
    /*
     * Package Service Providers...
     */
    Laravel\Socialite\SocialiteServiceProvider::class,
]
وفي نفس الملف config/app.php نضيف aliases للـ package
'aliases' => [
    ...
    'Socialite' => Laravel\Socialite\Facades\Socialite::class,
]
تعديل ملف users migration وذلك لإضافة حقلي social_id, social_type
php artisan make:migration addSocialToUsers
$table->string('social_id')->nullable();
$table->string('social_type')->nullable();
التعديل على User Model وذلك بإضافة social_id,social_type إلى fillable
protected $fillable = [
    'name',
    'email',
    'password',
    'social_id',
    'social_type'
];
protected $hidden = [
    'password',
    'remember_token',
    'two_factor_recovery_codes',
    'two_factor_secret',
];
protected $appends = [
    'profile_photo_url',
];
عمل migration من خلال تنفيذ الأمر
php artisan migrate
إنشاء routes في الملف web.php
Route::get('auth/google', [GoogleSocialiteController::class, 'redirectToGoogle']);
Route::get('callback/google', [GoogleSocialiteController::class, 'handleCallback']);
إنشاء Controller بإسم GoogleSocialiteController
php artisan make:controller GoogleSocialiteController
إنشاء الدوال redirectToGoogle و handleCallback
class GoogleSocialiteController extends Controller
{
    public function redirectToGoogle()
    {
        return Socialite::driver('google')->redirect();
    }

    public function handleCallback()
    {
        try {
            $user = Socialite::driver('google')->user();
            $finduser = User::where('social_id', $user->id)->first();
            if($finduser){
                Auth::login($finduser);
                return redirect('/home');
            }else{
                $newUser = User::create([
                    'name' => $user->name,
                    'email' => $user->email,
                    'social_id'=> $user->id,
                    'social_type'=> 'google',
                    'password' => encrypt('my-google')
                ]);
                Auth::login($newUser);
                return redirect('/home');
            }
        } catch (Exception $e) {
            dd($e->getMessage());
        }
    }
}
دالة redirectToGoogle تقوم بتوجيه المستخدم لصفحة google.
دالة handleCallback تقوم بما يلي:
إيجاد المستخدم إن كان موجود في قاعدة البيانات، إن كان البريد الإلكتروني موجود سيتم تسجيل دخول المستخدم، وإن كان غير موجود سيتم إنشاء مستخدم جديد وتسجيل الدخول
إنشاء صفحة login وإنشاء route لها ووضع زر التسجيل بواسطة جوجل بداخلها
<a href="{{ url('auth/google') }}" >Google Login</a> الأن بعد الضغط على هذا الزر في صفحة تسجيل الدخول أو إنشاء حساب، سيتم تحويلنا لصفحة إدخال البريد الإلكتروني، وبوضع المعلومات سيتم إنشاء حساب إن لم يكن الحساب موجود أو تسجيل الدخول إن كان الحساب موجود
